面向植物图像的 Hunyuan3D-1:一份可复现的探索指南
一套针对特定版本、注重证据的工作流:用 Hunyuan3D-1 生成探索性植株网格,并验证为何生成式三维输出不自动等同于表型测量。
 Liangchao DengPostdoctoral Researcher
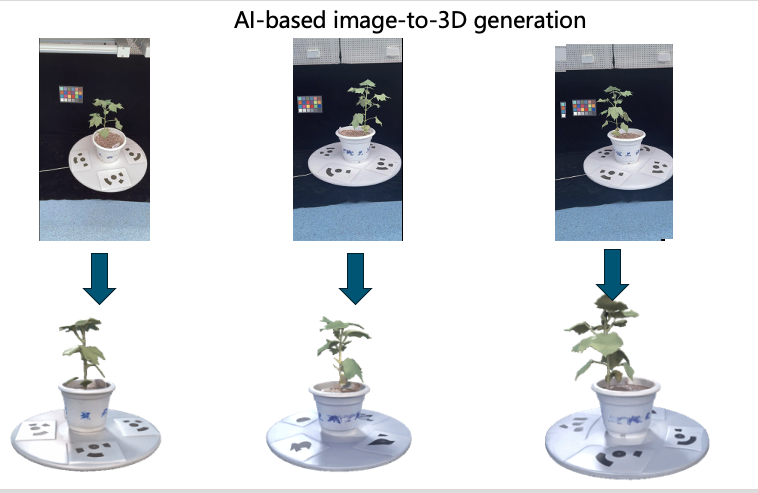
Hunyuan3D-1 是腾讯发布的生成式图生三维和文生三维系统。它能从单张植株照片创建带纹理的三维资产,这使其在可视化、假设生成以及研究生成式三维模型行为方面很有用。
它默认不是一个定标重建系统。单张图像无法观测植株背面、绝对尺度或被叶片遮挡的结构。模型必须推断这些区域,因此其输出在未经独立验证前,不能当作测得的株高、叶面积、分枝数或器官几何。
把生成的网格作为模型输出使用。不要把推断出的、不可见的几何当作观测结果。对于度量表型,应与多视图摄影测量、深度感知、激光扫描或带记录尺度的人工测量进行对比。
范围与版本
本指南记录公开的 Hunyuan3D-1 工作流,以便复现较早的实验。它刻意不虚构一个通用 Transformers API:Hunyuan3D-1 使用自己的仓库、权重布局、环境脚本和 main.py 入口。
安装前查阅上游的 Hunyuan3D-1 仓库 和 Hugging Face 模型卡。更新的 Hunyuan3D 版本有不同的代码和硬件要求;不要混用不同代际的命令。
1. 先判断方法是否适合问题
| 问题 | Hunyuan3D-1 适用性 |
|---|---|
| 生成式模型能否创建一个看起来合理的类植株资产? | 适合探索性分析 |
| 能否支持交互式可视化或合成场景? | 在检查网格后可能适合 |
| 这株植株的真实高度、叶角或分枝数是多少? | 在没有定标参考数据和验证时不适合 |
| 植株结构如何随时间变化? | 单图生成式输出不是可靠的纵向测量 |
| 模型能否跨物种和生育期泛化? | 需要一个预注册、独立标注的评估数据集 |
2. 准备可审计的输入集
对每张植株图像,保留:
- 未经触碰的原图和元数据;
- 物种或基因型及生育期(如获授权发布);
- 相机和光照信息;
- 背景移除方法及其版本;
- 一个把生成资产关联到源数据的图像标识符;
- 任何非原创图像的同意和许可信息。
使用简洁背景,让完整的可见植株在画面内。背景移除可能改善条件化,但它不会揭示被遮挡的器官或创造度量尺度。
先创建一个小型试验集。包含简单例子、密集冠层、细叶、重叠器官,以及开发集中未代表的物种图像。
3. 安装官方 Hunyuan3D-1 工作流
下面的命令对应上游项目结构。它们假设 Linux 和兼容的 NVIDIA 环境;请选择与已安装驱动和 CUDA 运行时匹配的 PyTorch 构建。
git clone https://github.com/tencent/Hunyuan3D-1
cd Hunyuan3D-1

conda create -n hunyuan3d-1 python=3.10
conda activate hunyuan3d-1
which python
which pip

# 先按照 pytorch.org 安装兼容的 PyTorch 构建。
bash env_install.sh
python -m pip install "huggingface_hub[cli]"
把官方权重下载到仓库期望的布局中:
mkdir -p weights
huggingface-cli download tencent/Hunyuan3D-1 --local-dir ./weights

mkdir -p weights/hunyuanDiT
huggingface-cli download Tencent-Hunyuan/HunyuanDiT-v1.1-Diffusers-Distilled \
  --local-dir ./weights/hunyuanDiT
记录 Git 提交和下载的模型版本:
git rev-parse HEAD
huggingface-cli env
python -m pip freeze > environment-lock.txt
完整流程对 GPU 要求很高。请查阅上游模型卡了解当前的标准、轻量、拆分流程和节省内存选项。成功安装 Open3D 或随机点云可视化并不能证明 Hunyuan3D 推理能运行。
4. 生成一个以图像为条件的资产
运行仓库入口,而不是调用诸如 AutoModel.generate_point_cloud 这样不存在的方法:
python3 main.py \
  --image_prompt "/absolute/path/to/plant.png" \
  --save_folder ./outputs/plant-001/ \
  --max_faces_num 90000 \
  --do_texture_mapping \
  --do_render
先用一张图像,并在尝试批量之前检查整个输出目录。为每个样本保存命令、随机种子、运行时间、峰值 GPU 显存、警告和失败状态。
主要输出是生成的网格和渲染资产,而不是测得的点云。如果下游应用需要点,则在保留该来源的同时从网格采样:
import open3d as o3d

mesh = o3d.io.read_triangle_mesh("generated_mesh.obj")
if mesh.is_empty():
    raise ValueError("The generated mesh could not be loaded")

mesh.compute_vertex_normals()
points = mesh.sample_points_poisson_disk(number_of_points=100_000)
o3d.io.write_point_cloud("generated_mesh_sampled.ply", points)
把 generated_mesh.obj 替换为实际输出文件名。从网格采样创建的是同一生成表面的点表示;它不会使几何更准确。
5. 诚实地评估植株输出
视觉质量审查
按预定义标准打分,而不是只挑好看的输出:
- 与可见图像的轮廓一致性;
- 缺失、重复、融合或断开的器官;
- 茎和分枝的连续性;
- 纹理泄漏和背景伪影;
- 推断背面的合理性;
- 跨种子和小幅图像扰动的稳定性。
几何验证
如果研究声明涉及几何,为同一标本采集一个独立定标的参考。仅用有记录的流程对齐,然后报告:
- 成功和失败生成的数量;
- 尺度和配准方法;
- 带单位的表面或点距离;
- 每个生物学单元的性状误差;
- 按物种、生育期和遮挡水平的性能;
- 对种子、裁剪、背景和输入视角的敏感性;
- 置信区间或重复运行的变异性。
在数据集、划分、基线、代码和评估定义都可用之前,不要报告基准数字。
6. 可复现性记录
保存一份清单,例如:
{
  "sample_id": "plant-001",
  "source_image": "plant-001.png",
  "repository_commit": "<git-commit>",
  "model_revision": "<model-revision>",
  "seed": 0,
  "command": "python3 main.py ...",
  "status": "success",
  "intended_use": "exploratory visualization",
  "metric_validation": false
}
也保存失败的生成。在检视后排除它们会产生误导性的稳健性估计。
已知局限
- 不可见和被遮挡的几何是推断的,而非观测的。
- 生成的资产不包含自动的物理尺度。
- 薄叶、叶柄、分枝连接处和重复纹理是困难情形。
- 视觉上合理的网格在几何上仍可能是错的。
- 输出质量可能因分割、背景、种子和输入视角而异。
- 训练数据覆盖范围和物种专属泛化不能由几个例子确立。
- 模型和代码许可必须针对预期的研究或商业用途进行核查。
何时选择其他方法
当需要带相机定标和尺度的基于图像的几何重建时,使用多视图 SfM。当参考几何和可重复测量是优先事项时,使用结构光、深度相机或激光扫描。当研究问题专门关于生成式三维行为,或当清晰标注的合成可视化合适时,使用 Hunyuan3D。
工作流审阅:2026 年 7 月,针对 Hunyuan3D-1 文档。上游命令和模型可用性可能变化。

DISCUSSION
Questions or field notes?